About PM4Web

The PM4Web blog was born as an outlet to return knowledge back to the web development community. My goal is to share my experiences as a project manager from over the years in a manner which helps you succeed with your own projects.

26 July, 2008

Quality Test Plan

A check-list for common website errors.

"...if quality costs a nickel extra, you quickly see the true colors of those who would have to shell out the nickel."
- Peopleware, Tom Demarco

It never ceases to amaze me how easily errors creep into the most rudimentary of websites. Even more stunning is that I’m often the culprit (e.g. I’ve almost launched a website with the word Melbourne misspelt as Melboure). You would think that after years of experience within the web realm, I should be getting better at it right? I guess its a bit like taxi drivers, because they spend most of the day on the road, you would assume they would become excellent drivers (we all know that isn’t the case). Whatever the reasons behind these common errors, it’s a given that they will be there, so if you know this, what do you do? A Quality Test may be the answer you are looking for.

How is a Quality Test different to a System test plan? A Quality test is designed to check for basic mistakes common to ‘information driven websites’, mistakes such as; spelling errors, bad grammar, broken links, missing image ALT tags, etc. A System test plan is designed to check a web application for bugs. By ‘information driven website’, I mean your stock-standard web presence (e.g. a company website with sections like ‘About Us’, ‘News’, ‘Contacts’, etc). If you are looking for information on System Test Plans, please see the article Writing a System Test Plan.

One of the best things about a Quality Test plan is how easy they are to make (about 30 minutes or less for a 10-15 page website), there really is no excuse not to do them. The purpose of a Quality Test is to check for; script errors (e.g. a crash occurring on a fill-in form), usability best practice (e.g. showing the user what page they are on), and SEO (e.g. descriptive page titles).

The structure of the Quality Test is simple, its just a Word document where you list every front-end page of the website (i.e. anything which is going to be visible to the Internet public). As far as conducting the Quality test goes, I would recommend getting an independent QA tester to do it (programmers shouldn’t be used as testers). Any problems found during testing should be logged in your bug tracking system, assigned by default to the project manager who can then direct it to the appropriate programmer.


The break-down of the Quality Test document is as follows:

Page Title – you want to ensure each page has a distinct and descriptive page title (i.e. the title that appears in the browser bar). This has a very significant impact on search engine optimisation (e.g. ‘Products – Xbox 360 action pack’ is far better then just plain old ‘Products’).

Max. Data Length – this relates to the fill-in forms appearing on the website. You are checking that textboxes have had their ‘maxlength’ attribute set correctly. This is a danger because you may have a textbox called ‘Company’, and the corresponding database field may be set to hold a 32 character string. If a user was to enter ‘International Shipping Industries’, that’s 33 characters, enough to cause a nasty script error.

Hyperlink Check – you are just checking for broken links. I would recommend an automated tool like Xenu (there are also websites which will crawl your site looking for broken links).

Navigation Check – there should be some kind of indication of what page the user is on. Its very easy for a person to ‘get lost’ on a website, especially when many levels of sub-navigation are involved. Good ways to do this are to highlight the active navigation button and to show a big title on the page currently being viewed.

Image ALT Tags – at a minimum, pictures which aren’t related to the layout should have an ALT tag. This connects to SEO and usability. ALT tags like ‘Picture’ or ‘Photo’ are pretty useless, UI experts say you should put sentence-like descriptions. For example; ‘Photograph taken at base of Mount Everest showing light snow coverage’, but I can’t say I’m a big supporter of that, I would more likely go with ‘Photo at Mt. Everest’.

Spell Check – nothing smacks of unprofessionalism like bad spelling, and the real travesty is how easy it is to avoid. Copy and paste the site's text into MS Word, run the spell checker and you’re done.

Proof Read – checking for well formed grammar is a little trickier. For one, it requires someone with a good grasp of the English language, and secondly, it can be extremely time consuming if it’s a big site. There have been times when I have off-loaded this work to the client. Another alternative is to recommend a copy writer.

Browser Compatibility – an old favorite. Just when you thought your website is done, someone comes out with “hey, have you seen the navigation bar in Opera? Its all squished”. As to what browsers you should be checking, that is a matter of browser market share (e.g. check 2-4 of the most widely used browsers). As far as screen resolution goes; a few years ago we were checking at 800x600 pixels, now it is 1024x768 pixels, this will probably continue to increase in future.

Required Field Check – this relates to fill-in forms on the website. You are looking to see if fields marked as required are being checked by the system. For example, there could be a textbox called ‘First Name’ which the user must fill in. If they go to submit the form without entering their first name, does the system show an error message?

Dilbert, think like a manager

Can a Quality test plan be used on a web application in addition to a System test plan? For sure, and I would actually recommend it. The Quality test is so quick to make, why wouldn’t you. Some tests will seem odd though (e.g. checking for spelling and grammar), but chances are good it will still reveal a few bugs. A Quality Test is no substitute for a proper System test plan when it comes to web applications.

Project Post-mortems

Running better projects by learning from the past.

The unfortunate reality with Project Post-mortems (also called Project Debriefing or Lessons Learnt) is that everyone thinks they are a great idea, but they rarely ever get done. I would say the main reason for this is because upper management generally doesn’t think its worth the commitment of resources. I have no sure-fire way for remedying this, but a good way of getting support from management is to stress that it wont take much time (e.g. 2 hours worth of debriefing meetings with technical staff, 2 hours to analyse the data, 2 hours to write the report).

What’s the point of a post-mortem you may ask? The obvious answer to this question is so you can learn from your mistakes (e.g. “I know for next time to start putting in the request for the SSL certificate much earlier”). But there are some subtler benefits to be had from creating this report. For one, it lets you analyse the effectiveness of your QA process (e.g. how many bugs in total were logged? how many bugs did you find vs. the client?, how many bugs seem to be the result of coders not following the spec?).

Probably the most important reason for undertaking a project post-mortem is the least obvious; its to engage technical staff, to ask them how they felt about the project. Far too often programmers feel they have been rail-roaded into doing things they didn’t want to do during a project, for example; cutting features, following technology choices made by management, having to work over-time because of poor time planning, etc. You must listen to people – that doesn’t necessarily mean you enact the ‘nerf guns for everyone’ policy your zaniest programmer requests, it just means sincerely listening to what they have to say.

If possible, I would suggest implementing at least one change based on your development teams’ feedback since this demonstrates you are actually listening. For example, if programmers are saying “we worked a lot of over-time to deliver this project, we should get time in lieu”, I wouldn’t propose getting them that time in lieu, I would instead suggest getting each programmer some kind of token gift to recognise their efforts (time in lieu isn’t the point, being appreciated is). Also, I’m against presenting gifts or bonuses to staff in meetings or in public settings. When management types do this, I think there is a certain aspect of ‘hey everyone, look what a good manager I am’ to it – instead, you do it in private, you just say “thanks Tony for the extra time you put into the project. I got you a Borders gift voucher for $30. I know its not much, but I just wanted to let you know we did spot the extra effort”.

The structure of the post-mortem report I use is very streamlined, being only two pages long. If your report comes out to be longer then that, consider stripping information until it gets down to two pages (remember, no one likes to read long documents). The process itself is broken up into three stages; debriefing the development team - where you ask programmers to give their thoughts on how the project went, data analysis - where you produce some simple statistics based on the bugs logged during the project, and lastly, writing the report itself – where you summarise both the feedback from programmers and make statements about the bug statistics. You may also want to include a conclusion at the end of the report where you ‘bring it all together’ and perhaps make some statements about what went well in the project and what could be improved.

When it comes to the debriefing session with the programmers, try find an independent party to run it. Their role is just to ask the questions you’ve prepared, note down the answers, and watch the time (two hours maximum, if it needs to go beyond that – bad luck). Having someone outside of the project asking the questions allows programmers to answer questions in an open manner; the project post-mortem isn’t a witch hunt. What sort of questions should you ask? Some examples would be; “are you proud of the work you did on the project – if yes; what in particular? If no; what went wrong?”, “what was the single most frustrating part of the project?”, “how would you do things differently next time?”, “what was the most satisfying part of the project?”, “which of our processes worked well?”, “which of our processes were hard to use?”, “if you could wave a magic want and change something about the project – what would it be?”, “did the customer participate effectively? If not, how could we improve this?”.

If you have been tracking bugs over the course of the project, you will be able to analyse these to produce some basic statistics. The sorts of stats I like to go for include; how many issues were logged during the project (and how many of these were bugs vs. feature requests), how many bugs were critical ‘show stoppers’ vs. low priority (like UI issues), how many of the bugs did you find compared to how many the client found (this is a good indicator of the effectiveness of your QA process).

Lets talk about the structure of the report itself. As is often my habit, I begin with a Document Purpose paragraph (e.g. “this document is a deconstruction of how the project went. The hope of this is to learn from our mistakes and identify successful processes which should be continued.”). You will most likely need to edit the answers given by the development team during their debriefing session; for instance, if one of the programmers has said “the client was a complete ass, he kept changing his mind every 10 minutes”, that’s probably not the best of things to be recorded in a document which upper management may see. This kind of statement would be converted to something like “members of the development team felt that the client was indecisive with regard to their requirements”.


For the Bug Analysis section, go for bullet point statements like “22.5% of all bugs logged were found by the client, the remaining 77.5% were found by us”.

Lastly, the conclusions paragraph is what its all about. Where you have a chance to make some grand statements which are backed by anecdotal statistics. You may want to say things like “the bug statistics indicate that as a team, we are not following specifications closely enough” or “based on feedback from the development team, there seems to be a consensus that a more detailed project schedule is needed”.

Will upper management really care about the project post-mortem report; probably not, at least not directly. But the post-mortem report is like a project schedule or spec, upper management generally wont be interested in the details, but they will appreciate that you have done it and it will be a reflection of your professionalism. Just be sure that it doesn’t become a mini-project in itself.

22 July, 2008

Writing Fee Proposals

How to write a fee proposal and knowing what to put in it.

Over the years I have seen a number of different styles used when it comes to writing fee proposals. Generally, the differences come down to personal taste; how much disclosure on costs do you give the client, how voluminous are your terms and conditions, should you put a portfolio of past work at the end of the document, and so on. My ideas on how to create a fee proposal are no more special then anyone else’s, but I have found they have worked well for me. I should say that this format of fee proposal is best suited to web development projects in the range of 40-120 hours in duration. So, you probably wont be winning that big government contract with this template.

With most of the documents I create, a big motivation is to go for maximum ‘bang for buck’ – no one likes reading long documents, so I’m not going to write more then I have to.

I like to start with a Document Purpose section, I do this in nearly all documents I create. If you look at it this way; you wrote the document, so you know exactly what it is, but when someone else picks it up, the first thing they will think is ‘what is this?’ The Document Purpose section can be something as simple as saying “the purpose of this document is to describe the tasks involved in creating The Blue Widgets shopping site. These tasks will then be used as the basis for producing a cost for the project”.


Next I like to have a section I call Purpose of the Website. This is a brief bullet point list of the business case for the website; what its trying to achieve in fairly concrete terms. For instance; ‘Let customers buy Widgets online’, ‘Give customers information about Widgets’, etc. These statements are big picture, they also demonstrate to the client what you think is important about their project. If there is misalignment of ideas, the sooner it comes out, the better.

Client Background is another block I like to put in. Nothing too long, just one paragraph to show the client I have been paying attention and have some basic understanding of what they do – I think this is important (e.g. “Blue Widgets has been manufacturing widgets for over 10 years and sells its products via a number of retail outlets across the country...”).

Another section which some people may or may not like is what I call Technology to be Used. You could say it’s irrelevant, but I like to set-out what programming language the system will be developed in and what database it will use. Probably the most important aspect of this section is technical limitations. And yes, you got it, this is an exercise in ‘covering your ass’. For example, you may make a statement here about what browsers you are going to support, or what CMS you are going to provide.

Arguably the strangest section in my fee proposals is the block called Non-requirements; why would you want to tell a client what you’re not going to do for them? It comes down to avoiding potentially costly confusion. You will find that most arguments in life arise as a result of ‘misalignment of expectations’ (e.g. “you said you were going to do this...” “you promised this...” “I never promised that!”, etc). This section is about nipping-things in the bud before they become problems. For instance; if you are creating an e-commerce site, you may want to say “the system will not support American Express credit card transactions.”

Now we come to the real meat of the proposal; the Project Components. If you’ve read my article on Project Schedules with Google Spreadsheets, you may be thinking that this section looks suspiciously similar to a project schedule, and you would be right. Once the contract is locked in, the project components segment serves as the basis for the project schedule. You have a task description and an hours estimate. The hour estimate is how you derive the cost of the project, and this is the point where some would disagree with my approach. I have had people say to me “you shouldn’t show a client tasks in such detail”, my answer is generally “why, they are paying for this project, shouldn’t I tell them exactly what they are getting for there money?” And yes, I have been questioned by clients on occasion about my hour estimates, but I have never failed to successfully defend my reasoning for an estimate.

Dilbert, budget cut

There are a few other smaller sections I put into my proposals, but I will cover these quickly since they aren’t as important as the previous sections. I have a paragraph called Change of Requirements – the crux of this is to say “if it's not in the fee proposal, then it's not covered by the project cost”. I have an area called Third Party Costs where I say that hosting is a separate fee. Then I have the obligatory Terms section, which is very short – I just talk about payment terms and how the project will run. I have a paragraph titled Software Warranty where I say how long I will be fixing bugs for free (e.g. 6 months, 9 months, etc). Lastly, I have a Project Engagement section where the client signs to signify their acceptance of the project.

Note: this layout is what I use for my contracting work, but I have used aspects of it at some of the companies I’ve worked at.

Article reviewed by Nicolas Fontaine.

19 July, 2008

Project Schedules with Google Spreadsheets

Task tracking, estimation and distribution with Google spreadsheets.

Creating software without a project schedule is like driving a car without a seatbelt; it can be done, but that doesn’t mean it’s a good idea. Before we go any further, I should say that this article isn’t about why you should have a project schedule. If you need that kind of convincing, may I suggest a great article by Joel Spolsky called Painless Project Schedules. In fact, the style of project schedule I use is derived from his method.

What I would like to talk about is how Google spreadsheets can be a real treasure when it comes to making your project schedules. Like many tales, this one begins with a cause to be championed. Not so long ago, I worked at a company with three programmers. It was my job to make sure projects were delivered on time and to spec. Resources at this company were very tight. This meant that any time savings I could get by streamlining a process, I would go for.

In the past I had used either Microsoft Project or Microsoft Excel for scheduling. Putting my project schedules in Google spreadsheets offered a number of perks. For one, the schedule was accessible from anywhere anytime (home, office, mobile, etc). Another bonus was that multiple programmers could edit their relevant areas without any sharing issues. Also gone were concerns about backups and where on the company server the file should reside.


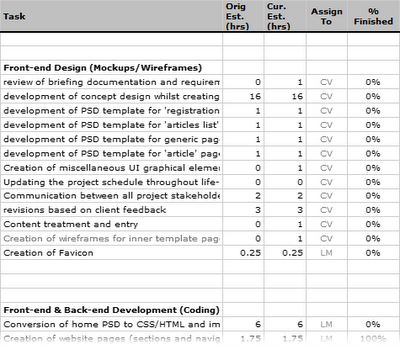
If you look at the structure of the project schedule I use, you may think to yourself “it’s so simplistic, surely that isn’t enough to cover a complex project?” But really, what more do you need? You write down what the task is, an estimate for how long it will take, who’s meant to be doing it, and how much of it has been done.

OK, you got me – this style of project schedule does have two major flaws. For starters, it’s hard to figure out delivery dates, another problem is that its tough carving out distinct milestone. But where this style or project schedule shines is in task management, you won’t miss things, and as the saying goes “the devil is in the detail”. It’s an excellent way for distributing tasks to team members. It also provides a very good overview of where you are at any given time within a project.

Personally, I tend to create my project schedules with only five phases (you can have more if you like). I’ve found all tasks will fit into one of these categories: wireframes/mockups, coding, project management, quality assurance, auxiliary tasks. Auxiliary tasks being the ‘catch-all’ for tasks which don’t neatly fit into any of the other categories.


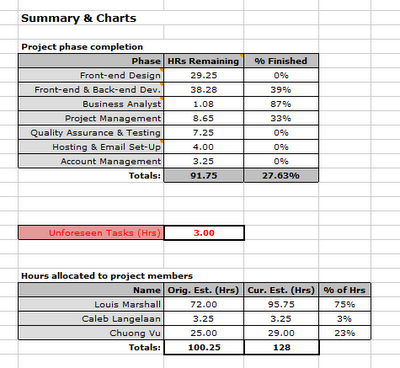
I also like to create a ‘summary and charts’ page, but this is gilding the lily. I find that it's handy when my boss asks me “how is the Widgets project going?” I can answer “overall, its 92% done – we are on track”. Its also helpful knowing how many hours have been allocated to different team members. One reason I do this is because I have a bad habit of taking on too many technical tasks which really should be going to the production team (what can I say, I used to be a programmer).

Having a project schedule is great, but the unfortunate reality is that most people could care less about it. From my experience, upper management generally aren’t that interested in the detail of the schedule, but they do appreciate its existence. They will more often be interested in milestones and delivery dates.

The other hurdle is getting programmers to use the schedule. Most of the time I’ve found programmers aren’t too keen on directly participating in the maintenance of the schedule, but you must bring them into the fold. Programmers are far more interested in cutting code, which is good – it’s what they love to do and what they are there for. So how do you get your technical people involved in the project schedule? Basic people management skills really. People will be far more inclined to do something if you ask them to do it rather then order them to do it, and people are more inclined to do something if they are given some choice in the matter. To a lesser extend, that often vague concept of ‘ownership’ comes into play here.

What I often say to the programmers I am working with is something along these lines; “Tony, when you have time, can you please go into the project schedule and update your areas. Also, for the life of this project, I need you to go in at least once a week to update your areas”.

Dilbert, Timeline

Over the years, I’ve found this approach works very well for a number of reasons; there is ‘choice’ in there; saying “when you have time” and “at least once a week” leaves some breathing room for people to manage themselves. People are always happier when they have options. The subtle wording; “your areas” connects to ownership. It means the project schedule belongs to them as well. Of course, never underestimate the power of manors - “thank you” and “please” always go a long way. There is a caveat with this approach however, it requires sincerity. People will spot it if you are saying something you don’t believe in.

Before I go, I would like to offer a few tips on how to construct your project schedule. When writing out the name of a task, be distinct, it should be some kind of action (e.g. “re-delegate domain name” is good, where as “undertake hosting tasks” is a little vague). Estimates for tasks should never be more then 16 hours (if they are, break it down into more tasks), but also avoid too many 0.25 hr blocks - that’s just going overboard. Do your best to fill in the ‘current estimates’ column, this can be used in future to highlight tasks you’ve underestimated.

Article reviewed by Sarah Hunt.